Wort is the sugary tea that gets fermented into beer, and cooking-up a batch is the first step in the brewing process.
Before you do anything, however, open a beer (ideally a homebrew -- yes, I made that!). This is a crucial first step. Beer can sense fear, and will go all wonky if you stress it out, so relax, play some tunes, and get into the brew-zone. (Plus, you're going to need the empties!) As Charlie says throughout his homebrewing bible "Relax! Don't worry! Have a homebrew!"
If you are embarking on this quest before it is acceptable to have a beer in your household, please keep the following poster in mind. Loosely translated, it says no beer will be served before 4 o'clock. Put one of these over your kitchen clock an you're in business! (My kids sent me this postcard while they were visiting family in Germany -- aren't they great kids?!)
Ok, now you need a recipe. As noted before, Charlie's book is pretty much all you will ever need. He has a chart in there listing 36 different styles that run the gamut from pale ales to lagers, marzens to weissbiers, pilsners to stouts, porters to lambics, bocks to bitters, ... you get the picture. And, there is a sample recipe for each one! Unless you go uber-brewer, you'll never need anything else to stay happy in this hobby for a very long time.

Most of Charlie's recipes are for 5 gallon batches. I prefer to brew 3 gallons at a time, so I have a handy little notebook where I keep detailed and tidy notes on the conversion of Charlie's measures to the amounts I need in my smaller batches. All you have to do is multiply eveything by 3/5, and remember that there are 28 grams in an ounce (rounding up to 30 makes the math easier if your doing it in your head), 16 ounces in a pound, 2.2 pounds in a kilogram, 454 grams in a pound, and 250 mililitres in a cup. These will help you swap measurement systems to make conversions easier. For example, most of his recipes say you need 1 oz. of hops at some point -- 3/5 of an ounce is impossible to measure, but if you convert it to 17 grams, you're in business! (As you can probably guess, you need a scale.)

The ingredients for a basic batch of beer are malt extracts (the picture shows both syrup and dried), grains (these add extra flavour, so I recommend you do a batch that calls for grains), hops (I use pelletized hops -- they're just regular hops that have been run through a hammer mill to make little pellets. Pelletized hops are easier to store and handle and retain their freshness for longer than fresh hops), and yeast. Be sure to buy two packs of yeast so you have a back-up if the first package should poop-out for some reason (it happened to me once in the last 13 batches, so it is not common, but you don't want to be tempted to throw bread yeast in there to save your batch!) On the equipment front, you need a stock pot, a spoon, and a fine mesh metal strainer.

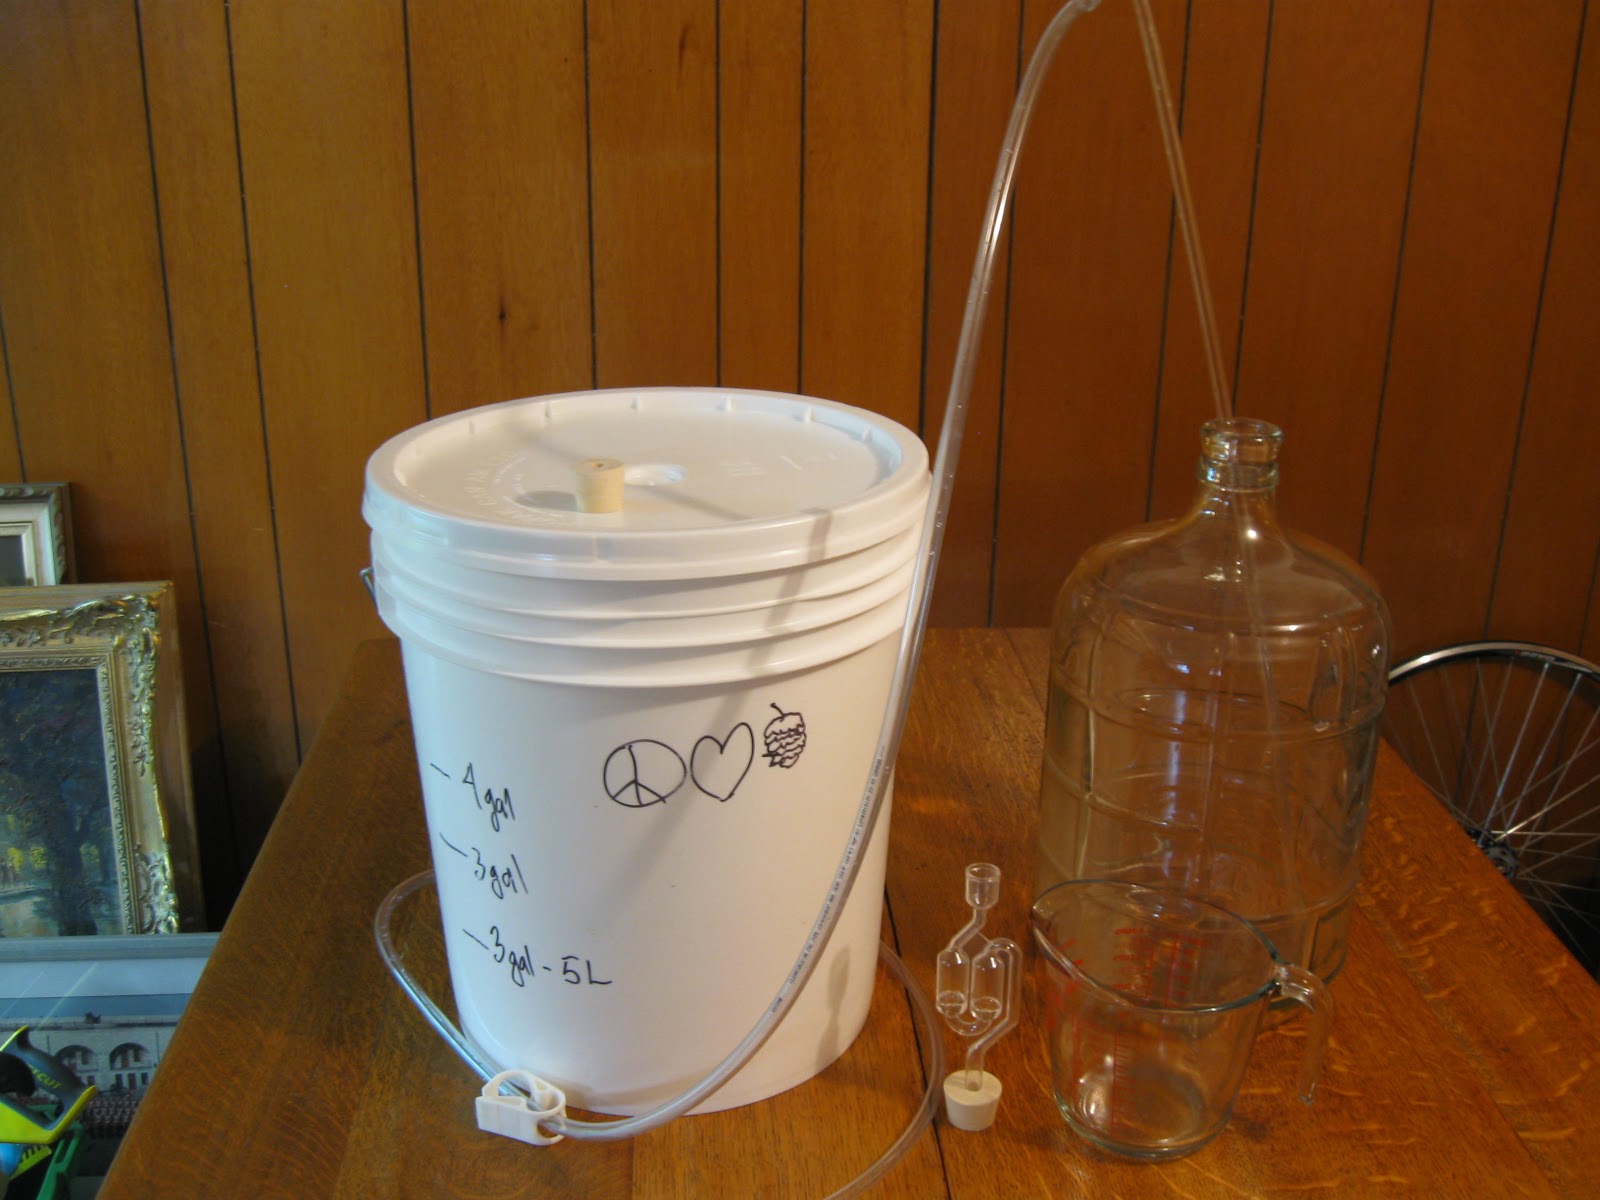
You'll also need a 5 gallon bucket in which to do the first round of fermentation. A typical beer kit will have one of these buckets, a lid, a glass carboy, an air-lock, and various siphon hoses and other doohickeys that you may or may not need. The essential bits are the bucket, lid, carboy, airlock, and siphon hose.

Step 2 (step one was opening your beer) is to get your primary fermenter ready. Charlie's book (at least the version I have) advocates a single stage fermentation directly in a carboy. This is the (ok, one of the) only thing in the book I don't follow. To do single stage fermentation, you need to attach a blow-off hose to your carboy and cross your fingers that the whole thing doesn't get clogged and blow up all over the place. Personally, this sounds like a recipe for disaster, so I much prefer two stage fermentation where you let the brew go nuts in the less constricted environment of a bucket, then transfer it to a carboy later to mellow out and finish the process. Your call.
ANYWAY, to go two-stage you need to get your fermenter ready by sterilising it. I use Diversol, which is a pink powder that you mix with water (1 teaspoon per litre). I pour three litres of water into my bucket (it's handy to have a 1 litre measuring cup for all this), and add a tablespoon of Diversol (I chose this amount because I only have a tablespoon in the laundry room). I carefully swirl the mix around the bucket so it touches every surface, let it bucket sit around for a bit, and then swirl again.

At the same time, I pour a little out onto the lid, and let that sit there for a while too. (How long? No idea. There is no time on any of the instructions I have. I usually give each step a couple of minutes.) Sanitation is crucial to the process if you want a quality brew. There are freaky bacteria and yeast floating around all over the place, some of which will mess-up your beer if they get in there. You don't have to be insane about it, but take your time and do your sanitation properly. As Charlie says with almost annoying frequency, "Relax. Don't worry. Have a homebrew!"
Once I think my lid and bucket are sterile, I rinse them them. The lid is easy, but the bucket is a little trickier. I tilt the thing to the side and turn it so that tap water can run down the walls (you are going to use a lot of water) while I rotate the bucket. Once the walls are rinsed, I dump out the water and rinse it again. After 3 or 4 rinses all the chemicals should be gone.
Then I fill up the bucket with cold water. Your wort will be about 5 litres or so depending on the size of your stock pot, so try and fill your bucket so that it will reach the total volume of your recipe once the wort is poured in there (i.e. fill it to 3 gallons minus 5 litres -- I love being a mixed-unit Canadian -- if you're brewing a 3 gallon batch and have a 5 litre kettle). It's handy to get a Sharpie and mark all these volumes on the outside of your bucket to make life easier.
Get the bucket in the kitchen. (Holy crap! All we've done is fill the bucket with water, and we're already at 50 pages!)
Ok, the next thing to do is get your grains ready. This is what malted barley looks like before the mashing process. The malted seeds are toasted to varying levels to add nice flavours and colours to your brew. Weigh out your grains according to the recipe (or your custom calculations). Then get ready to crush them.
If you recall in the previous post, I said that a seed is like an egg. If you want to get the good stuff out, you have to crack the shell. I used to do this with a rolling pin on a cutting board, but that is SUPER messy and annoying. A mortar and pestle does a great job! Use a grain mill if you have one. Just don't grind them up too fine -- you don't want to create a pile of powder, you just want to crack the seed coats so some water can get it there.
Now get ready to BREW!!!
Fill your chosen kettle with water, leaving several inches of space (the malts will boost the volume, and you DO NOT want to try and get water out of the kettle later, whereas it is very easy to add more if you don't have enough).
Put the cold water on the stove and dump your crushed grains in there.
Crank the heat to high and wait until it starts to boil. This process slowly heats the grains and extracts the colour and flavour without boiling the seeds. Boiling would be bad because the extended high heat would start to extract other nasties from the seed coats like tannins that would make your brew astringent. A gentle and gradual increase in heat is what you want here.
Once the water is at the point of boiling, TURN OFF THE HEAT. This is key (and I haven't seen anyone else say this). Why? Because a) you have to get all those seeds out of there, and working over a bubbling cauldron is no fun (unless you happen to be in Macbeth), and b) you're going to put your malts in there soon and you definitely do not want to be dealing with high heat then.
Use your fine mesh metal strainer to scoop out the seeds. Dump them in a big bowl, and save the bowl because there will be more gunk to scoop-out later. When you think you've got them all out, stir the pot until you get a whirlpool and scoop again -- you should get a bunch more. Try and get them all out so you don't end up with the tannin problem discussed above (but of course, "Relax. Don't worry..." you know).
Now it's malt time! If you use a syrup, pour that in. Having the heat off at this point is crucial, because the syrup will sink straight to the bottom of your pot. If the heat is on, there is every chance the thick goo will stick down there and start burning. This will RUIN your brew, so having the heat off right now is a good idea. (Personally, I think it's a GENIUS idea.) It's also a good idea to stir while you're doing this to get the syrup dissolved and distributed in the wort.
If you use dried extracts, just pour them in. They will gradually sink and dissolve, but again no heat and a good stir are good ideas here. (As you can see, I pour from a bowl. Don't try and pour dry malt directly from the bag -- it will get all gummed up, will fall out in big, splashy clumps, and will generally make you miserable.)
Now. Focus. This is the danger zone. (But "Relax..."). For the next hour, you'll be boiling a pot full of hot sugar. There are a bunch of proteins and other good things in the pot that have a tendancy to seal the surface. If this happens, you're in for a BOIL OVER, which is the messiest, biggest bummer associated with brewing. So avoid it! (Remember this now!) A boil over happens when the steam bubbles can't break the surface, so instead they LIFT the surface and pull up all the underlying liquid at the same time. And by up, I mean up and right out of the pot and all over your stove, floor, and hot element. So it's up to you to watch the pot, stir it now an then, lift it off the burner if the foam starts to rise, and modulate the heat to maintain a gentle, open boil. If, for some reason, you have to leave the kitchen, get the pot off the heat and give it a stir, and get back in there as soon as you can. I find liquid malt extracts are less likely to boil over, but it's always a risk so be prepared!

Once the malt is dissolved you can get the heat back on and add your bittering hops. There are three basic times to add hops to your wort. The first hops go in right at the start and they make the beer bitter (all of the flavour and aroma from the hops will boil off over the course of an hour). Flavour hops go in around mid-boil, since those compounds are more volatile than the bitter elements, but not so volatile as the aromatic compounds. Aroma hops go in during the last two minutes of the boil, after which the wort is immediately dumped into the cold water in your fermenter (aren't you glad it's sitting there ready to go?) to keep the aromas from boiling away.
All this to say, you should measure-out each of your hops additions so they are ready to go at the appointed time (the stove timer is a great thing to use, by the way).
Once your hour of fun in the kitchen is almost up, it's time to strain the wort again. The gunky organic residue from the hops will decompose in your brew, so you have to filter them out as well as you can. You will be pouring your wort through a seive into the fermenter, but it will clog up if you hit it with the whole mass of hops at once, so it's a good idea to get most of them out of there now. Note that you should do this BEFORE you add the aroma hops, since there will be no time to spare once those go in (let them get removed while you pour into the fermenter).
As with the grains, just stir and scoop and repeat until you have most of the gunk removed. Your seive will clog up, but if you jiggle it and tilt it, you should be able to drain it ok. Whack it upside down on your grain bowl, and go back for more until you are bored and figure you've removed most of the gunk.
Once you're done with removing the hops residues, leave the seive in the pot so it can sterilise. You have to pour your beer through it on the way to the fermenter, so you want it as pristine (bacterially speaking) as possible.
Then set your timer for two minutes and add the aroma hops (if your recipe calls for them) and get ready to SPARGE!!
Sparging is the process of pouring your wort through a seive to remove all the organic debris that your don't want in your fermenter. We've already done much of the sparging by removing the grains, the flavour hops, and the bitterness hops. This last bit of sparging will remove the aroma hops and any of the other stuff you missed the first times around.
Get your seive out of the pot and balance it on your fermenting bucket.
Use your leg to hold it in place if you don't have a helper. Pour the hot wort through the seive and into your fermenter. You WILL make a mess, no matter how hard you try not to. Oven mitts are handy here, so is a steady hand and a gentle pour.
Once you've sparged, get the seive out of there, pop the lid on (don't snap it down, just cover the bucket), and take the brew to wherever you plan to let it rest for the next week. Some sources recommend stirring at this point, but I don't bother and just let the wort mingle with the water for the next 6 hours while I wait for it to cool down enough for the yeast.
(Now, some people will extract some of the liquid and measure the specific gravity at this point so they can get an idea of the potential alcohol content of their final beer. I find the whole specific gravity thing a big pain in the butt and so I avoid it entirely -- I have only done it with one batch of beer, and then only patially. It is useful if you're in a big hurry and want to bottle as soon as possible, but I usually let my batches mellow out for several weeks and so have never found this whole thing all that necessary. Your call.)
Once the wort has cooled (you could sterilise a thermometer and keep checking, but I find that a pain so I just wait for 6 hours or so) you pitch the yeast! All you do is open the yeast packet, open your fermenter, and sprinkle the yeast on the surface of the brew. Cover the fermenter again (again, don't snap the lid on -- the CO2 needs to get out of there) and let it rest for a week.
It's a good idea to check in the morning to ensure your yeast has taken. The brew should be all bubbly and foamy by the next day. If it isn't, pitch another package of yeast (aren't you glad you got two?). Check again the next day, and if it still isn't bubbly, change brew supply stores. Once you know the yeast is working, leave it alone for a week -- resist the urge to peek, since every time you open the fermenter, you're giving nasty bacteria and wild yeasts the chance to get in there and run wild with your creation!
Next up, secondary fermentation! (Having fun? I am!)