Tuesday, April 26, 2011

Build a garden bed!

I decided to add some space to the garden this year. The soil in my backyard is like cement, so a good option is to build raised beds with good earth, and it will gradually break up the hardpan underneath and make for a nice little garden plot.

The first thing to do is stake out some territory. This is good to do a few days in advance so you can see how the sun hits the spot, if you trip over it all the time, and if the lawnmower can get around it. Throw some junk in there while you're at it since it will give the worms something to eat at the bottom of the bed and might help break up some of that concrete on the bottom.

The next step is to build the walls. Lee Valley sells these cool connectors from Sweden that do a great job of holding boards together. They are meant for making stacked planters, but work just fine for one storey efforts too. I used cedar 10 inches wide and one inch thick. Cedar costs a bit more, but it will last forever and you don't have to worry about all that preservative gunk they use to make other woods survive in the great outdoors. The board at the top is a guide to make sure the boards I am attaching are straight.

Essentially, you just bolt up your boards and put them on the ground. Since the metal brackets are only 8 inches long, you have to decide which end of the boards to put them on. I keep them at the bottom, since the earth will settle at the top anyway.

Here's a shot of one on a two-year old bed, and it seems to be doing just fine.

I also hammer in some 3 foot rebar against the wall on each side to help support the walls against the pressure of all that dirt. I'm not sure it is absolutely necessary, but then again I wouldn't know because I always do it. I give them a spray with rust paint first to keep them looking lovely.

Once your bed is laid out and filled with garden debris...

...order your dirt! I used a premium organic blend from Greely Sand and Gravel. It looks like good stuff to me. I got 5 yards, but the 8 foot by 12 foot bed only needed about 4 yards to fill it.Can't hurt to have extra dirt though, and as you know, I'm a too-much-is-better-than-too-little kind of guy. (Note, the beer and radio are vital accessories for this work.)

One important point is to not bolt the whole thing together at the start. Leave one bracket unattached so you can open the door for your wheelbarrow.

Speaking of wheelbarrows, I had THE most spectacular wipe-out of my gardening career on load number 34.

There I was, happily chugging away on the project when...

...all of a sudden the stupid piece of wood at the front of the wheelbarrow dug into the ground. (I think this is the design flaw of the century, nay! of the UNIVERSE!)

So I ended up flying right over the wheelbarrow (ass over tea kettle is the proper term, I think).

And landed somewhere, somehow in such a way that I only got a wee scratch. Some people out there may think that the beer contributed to this wipe-out, but I am positive that it saved my life and kept me all bendable like Gumby so that I didn't get hurt on impact. That's my story, anyway, and I'm sticking to it. I thought this whole thing was pretty hilarious -- Americas Funniest Home Videos worthy for sure. Sadly (maybe not, actually), no one was filming this miracle so it has been brought to you via paper and a Sharpie.

ANYWAY, pile the dirt nice and high. You need to keep the door area clear so you can close it and bolt things together so it's good to pile it up and rake it back into that empty space at the end. Once you think you have enough dirt in there, bolt the door closed, hammer in the last piece of rebar, and start raking.

Go for a walk on the garden once you've done the initial raking to pack things down a little, and ...

volia! Mission accomplished! Ninety-six square feet of total fun! I put a wee plant in there right away in the top corner for luck -- you know, like putting a penny in a wallet when you give it to someone. Now you're off to the races! Get plantin'! (And watch out for bumps!)

Friday, April 22, 2011

Potimarron squash soup: Day 55

Well, it`s been a while since this recipe started. Today, I decided to plant the squash seeds.

In the photo, you can see some Red Kuri squash seeds (in the middle) and some Potimarron seeds from two different sources on either side. Guess what? I don`t think they`re the same (call me crazy!). You may recall that there was some controversy over this whole thing, and that I planned to plant both `just to see.` Given the clear difference between the seeds, I think it`s safe to say that there is no need to use up any precious garden space on the Red Kuri seeds I was sold. I want to do this soup right!

We`ve had a miserable (i.e. real) spring this year (it usually goes from winter to summer in about 36 hours with the odd snow thrown in after just for fun). This means that the garden won`t be ready for squashes until the traditional May 24th long weekend `GET EVERYTHING IN THE GARDEN RIGHT NOW OR FOREVER HOLD YOUR PEACE!` event that we Southern Ontarians are used to. But, it is still a great time to get a head start. Seeds subjected to the garden striaght away will be mowed down by every predator imaginable, and unless they`re tough (like radishes) you can kiss them goodbye as soon as you plant them. Giving them a few weeks in pots will help get them through the tender first days and leave you with lots of extra leaves to feed the slugs etc. and keep the plants growing too when you finally plant them out.

All you have to do is fill some pots with dirt (I don`t want to have to move the squash seedlings to larger pots later, so I use 4 inch pots right at the start), water the dirt, and poke some seeds in there (push them down about 1 inch).

Then carefully water the pots again so that the dirt landslides over your seeds and covers them gently.

Now get the pots into a warm place and ... wait....

If it`s warm and sunny outside, get them into real sunshine as soon as they sprout. Keep them away from frost and cold, but the more sun and fresh air they get from now until planting-out the better.

Happy Earth Day folks! Dig, grow, and be merry! (And have some beers too!) 

Saturday, April 16, 2011

Pastitsio!

This recipe comes from the Greece issue of Saveur. This, along with the Roman issue are among the biggest home run issues of cooking magazines that I have ever come across. Funnily enough, I almost didn't read most of the magazine. When I got it, I screeched to a halt at the Chicken Galliano recipe on page 28 -- there was still almost 100 pages of awesomeness to go when I finally got around to flipping through the rest of it.

Pastitsio is sometimes referred to as Greek Lasagne -- a name which I don't think really does it justice, since it is brilliant in it's own right and needs no comparison. It is kinda like lasagne though.

The basic steps are to make a meat sauce (this can be done a day or so in advance if you want), then you cook up some noodles, layer the noodles and meat sauce, coat the whole thing in a creamy bechamel, bake it up and delve into culinary heaven when it's ready! Huzzah!

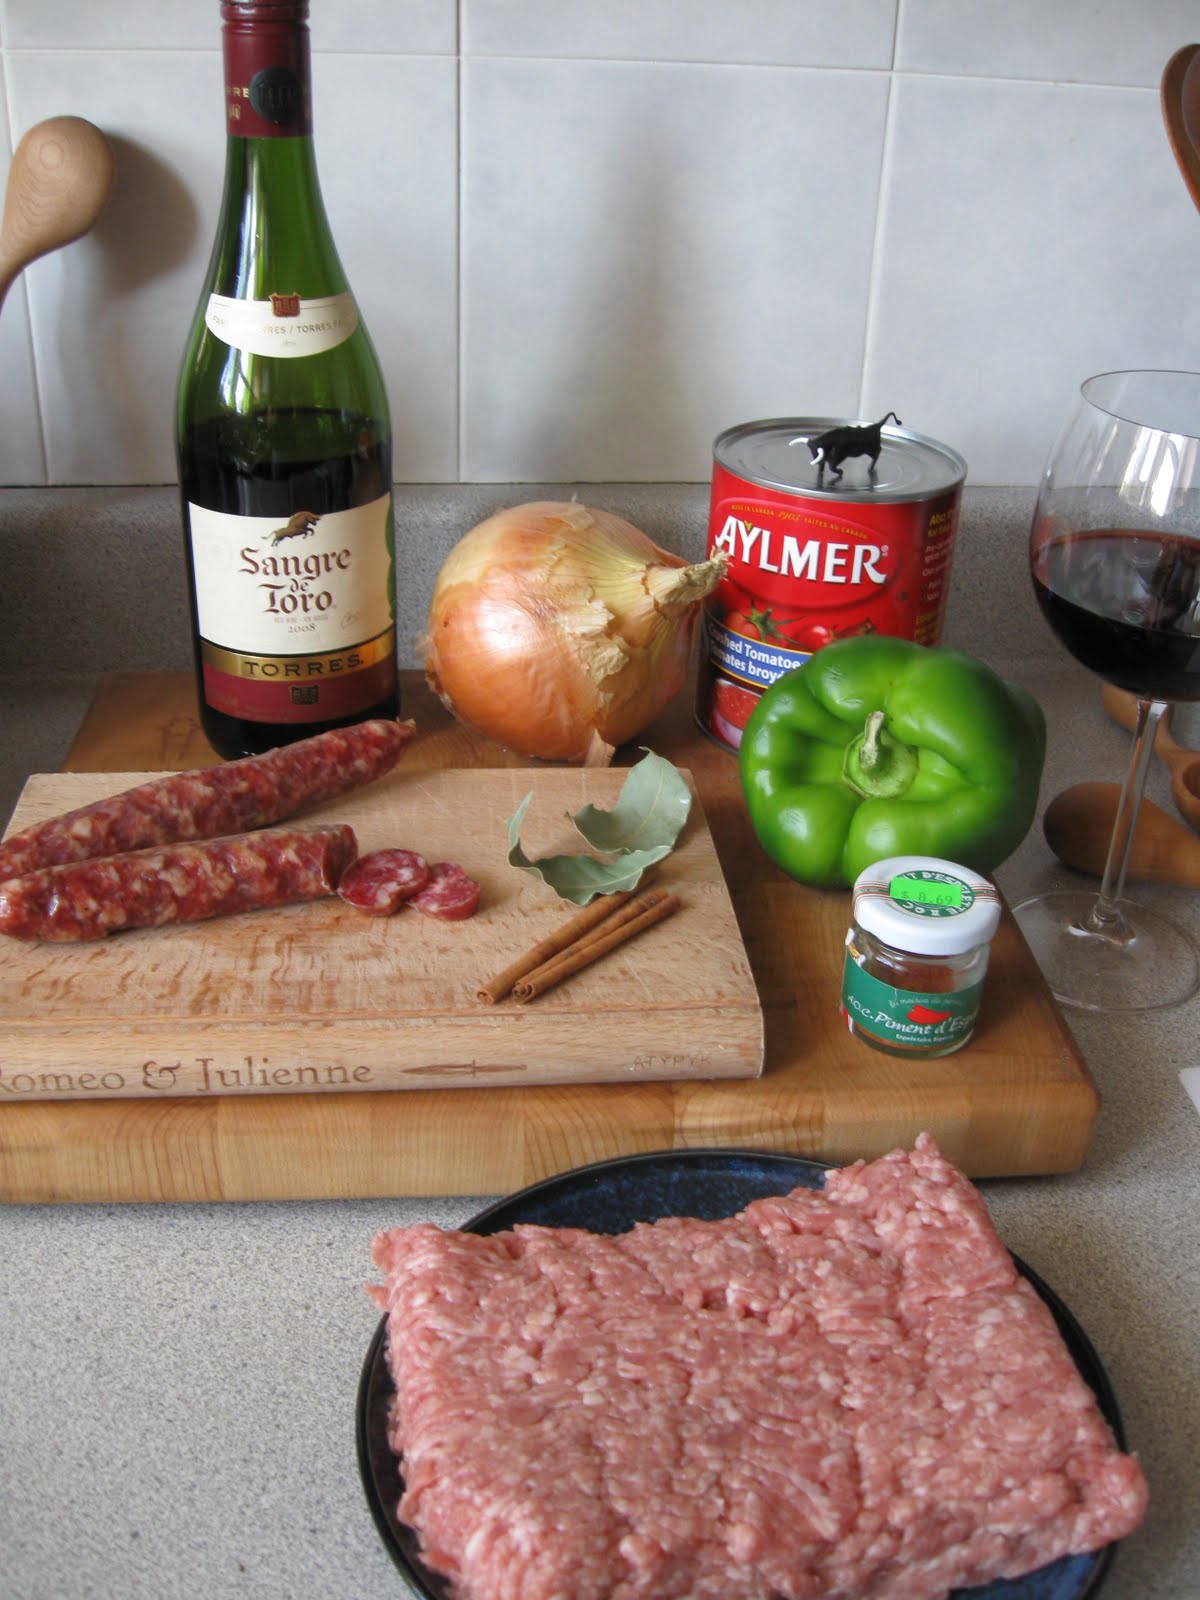
For the meat sauce, you'll need a pound of ground meat (I used pork, but beef and veal are supposed to be ok too), 3 oz. of dry-cured sausage like chorizo or something (I get cool ones from a local Italian deli called Nicastro's), 2 cups of crushed tomatoes (I used a whole 796 ml can), 1 green pepper (the recipe says 2, but this puppy was HUGE!), 2 yellow onions (again, I had a huge one, so went with one), 1/3 cup of red wine, 1/4 teaspoon of chile flakes, 2 bay leaves, and a two-inch stick of cinnamon (mine were kinda skinny so I went with two). I'm good at following recipes, eh?

I chose a nice Spanish wine called Sange de toro (bull`s blood!). The cool thing about the kind I get is that it comes with a little plastic bull on the bottle. You may notice the bottle has been dipped-into in the ingredients photo -- this reminds me to give you a little advice: pour your 1/3 cup of wine into a measuring cup now before you drink it all.

This bull is a great opportunity to make a bunch of lame jokes the whole time you cook supper. You can say `What is all this bull?!`and stuff like that over and over again. You can also do the whole Bugs Bunny schtick with `What a gulli-bull!` and `What a nin-cow-poop!` You know, work it! It`s way easier to be hilarious than you think.

ANYWAY, finely chop your onion and bell pepper and saute them for awhile. The recipe says 10 minutes, but I did mine for more like 20 -- number 2 kid doesn`t like onions, so I like to make them really soft.

While that`s going on, chop your chorizo. Make the pieces pretty small, since they will add great flavour throughout the whole dish and you want to make sure there is enough to get around.

When the onions and peppers are good, slide them out of the pan (the recipe says to use a slotted spoon -- good luck with that, I just dumped it). Then get your sausage and ground meat in there, and brown them for about 10 minutes.

When that`s all nice and browned, add the onions and peppers, the crushed tomatoes, the wine, the chile flakes, the cinnamon stick(s), and the bay leaves. Bring that to a boil, then lower the heat and let it simmer away for about 15 minutes.

When the sauce is nice and thick, turn off the heat and season with salt, pepper, and the ingredient I forgot to mention at the start: some grated nutmeg. Remember my cool nutmeg grater?

 Ok, now on to phase two: noodles, bechamel, assembly and baking. You can stop here and do the rest another day, just remember to heat the sauce again to make sure it will spread out easily when you go to assemble the casserole.

For this stage, you`ll need 1/2 cup of butter (the recipe says 8 tablespoons -- I have no idea how they expect you to measure it that way), 1 cup of flour, a whole litre of milk, 1 cup of grated parmesean, and 3 eggs. You`ll also need salt and pepper and a little nutmeg to season the bechamel.

Start by melting the butter. Use a sauce pan because we`re making buckets of bechamel. You may as well heat your oven now too -- fire it up to 350F.

Gradually whisk the flour into the butter, stirring with each addition until it starts to clump up too much for the whisk to handle it.

I wasn`t able to get the whole cup of flour worked into the butter at this point, so I had to start adding milk to make it more fluid and able to accept more flour.

Just keep working in the milk and any remaining flour bit by bit until you have a nice smooth sauce. Let this blup away for around 10 minutes, whisking it every now and then.

While that`s going on, you can get your noodles on the boil -- you need a pound of noodles. The recipe calls Greek macaroni -- I have no idea where to get that, so I went for some awesome Rustichella d`abruzzo noodles called casareccia -- they look like ziti sliced down one side. The main thing here is to not cook the noodles all the way through -- they`re headed into a sauce and then the oven for an hour, so they will mush-up too much if you cook them all the way. The casareccia is supposed to be done in 8-10 mins, I let them boil for 7 and it worked fine.

By now, your bechamel should be ready. Take it off the heat, and mix in 3/4 cup of parmesan. Then whisk in the yolks from the three eggs. When you separate the eggs, keep the whites since you`re supposed to whisk those up and mix them with the cooked noodles and the remaining cheese. I found the egg whites on the counter when I was about to put the casserole in the oven, so I clearly forgot that part.

Ok! Build your casserole: you need a 9x13 inch pan for this. Put down a layer of noodles (noodles mixed with egg white and cheese if you remembered to do it), then add the meat sauce (use a spoon to put it in so it doesn`t blast the layer of noodles out of the way when you pour it in), then add another layer of noodles. How do you like my awesome pan? My bro`and his wife got it for me for Christmas. Wolfgang Puck no-less. Cast iron too! So awesome!!

Pour the bechamel on top, and if you forgot to do the egg white thing with the noodles, you may as well sprinkle the reserved parmesan on top of that. This looks like a pretty full pan, and I was a little worried that it would blow over the edge in the oven. The bechamel didn`t puff up much though, so it worked-out just fine.

Let the top brown for an hour, haul it outta there, and eat up! See the vote of approval? It was really, really, good. Watch out though -- this casserole holds the heat so if you take a big mouthful right off the bat, you`re history (you`re supposed to let it cool for 20 minutes before serving -- good luck).

Καλή όρεξη! (Kalí óreksi!)

Thursday, April 14, 2011

First harvest!

Here is the first harvest form my garden for 2011! This is horseradish. I had to thin the patch out since it was threatening to take over the world, and figured I might as well use some of the clump that I dug up. (I also shipped off a big clump to John at work, so it can now take over his garden too.) My plan is to wrap these up and keep them in the fridge until I need a little zing on a sandwich (mmmm....roast beef!) or in a salad, or wherever else I can dream up. I left the tops on because I figure they will stay alive the whole time, and I can just stick whatever is left in the garden if I decide I want more. (You can not kill this stuff no matter how hard you try -- it`s tougher than dandelions ... and that`s saying something.)

These roots will get funky on cut surfaces that are exposed to air, so don't peel it until you need some, then just grate up a little chunk (prepare to cry! it`s worse than onions by a mile) and carry on. If you have to wait between peeling and preparing them, just dunk them in a bowl of water until you have time to attend to them.

I am planning a stellar roast beef sandwich on caraway rye from Rideau bakery. I`ll add some romaine lettuce, a couple of slices of tomato, a bit of red onion, maybe a little chutney, probably some mustard, and a little mayo (laced with my firey friend above, of course!).

This may call for a beer too.

Mmmm...maybe I`ll toast the bread. Wow.

My next post should be a recipe -- it`s been a while! I am planning to make a Greek casserole called Pastitsio. So stay tuned! (Unless it fails miserably, in which case I may just make another sandwich.)

Saturday, April 9, 2011

Spring has sprung!

What a difference a week makes! I had a quick trip to NYC for work last week, and returned to find the earth warm, the snow gone, and my belly two sizes larger thanks to McSorley`s burgers and beer. :D

A sure fire sign of spring is that the rhubarb has finally erupted. Everything else will soon be on it`s way.

Another sign of spring is that it is nice to drink beer while working in the yard. Actually, I enjoy drinking beer in the yard any time of year, but still. Anyway, I dug into the cellar and came out with some Bog Water. Sadly, it was my last bottle. Happily, it was a big one!

Today was a quick blitz in the garden to get things going. The time between ice-out and full blown summer is about 30 seconds in Ottawa, so if you want to grow any cool weather crops you have to get them in the ground now.

I also plan to add a new garden bed to the collection this year -- I need space for all those freakin` squashes. I`ve marked out the space with bamboo poles. This is important so you can test if the lawnmower fits between it and the other obstacles in the yard. If the lawn mower doesn`t fit, then move it because you will have no end of misery otherwise.

Incidentally, a new garden bed is a great way to get rid of all the weeds and other crap that you didn`t deal with in the fall (because you were, like me, lazy). Just rake it all up into the space, and when you build the walls and add the dirt it will magically disappear! Genius! (I`ll post the building process another day -- once they deliver the 5 yards of dirt I need!)

Today I planted favas and peas, and also put in some arugula, radishes, shallots, turnips, and a bit of lettuce. I`ve posted how to do this before, but a quick review:`

Use the end of your rake handle to make `drills` for the seeds. The drills should be about two seeds deep. Put the seeds in and pull the soil over them with the back of the rake.

Remember to tamp them in with the flat side (this helps keep them from washing away in the rain, and ensures good contact with the soil). It`s also good to mark the rows with sticks before you do this so you remember you put something there.

And that`s it. You can water them in if it`s super dry, but we`re expecting rain later in the week and the soil is still pretty moist, so I didn`t bother. This is also the best time of year to get grass and other nasties out of your garden before they take over. They will still take over, but at least things will look nice for a few days.

Peas, by the way, are lovely if you look at them closely. You can tell the sweet tasting peas by their shape. Sweet ones shrivel-up as they dry -- something to do with the sugars in them. These are Dwarf Grey Sugar peas -- dented and sweet. They have nice flowers too.

I found one of those groovy fuzzy caterpillars today. I don`t know off hand what these turn into, but they sure are neat.

I was planning to do more work tomorrow, but it is supposed to be sunny. And warm. And not windy. And since I got my best mechanical friend back today, I may have to take the opportunity to stretch our legs and enjoy the glorious day. In the meantime, happy gardening to you all. Vroooooooom!