Sunday, October 31, 2010

¡Hot tamale, hot, hot tamale!

I just returned from a week long trip to Santiago yesterday, and wanted to post something about cool foods I got to try while there. Unfortunately, I couldn't find anything that really seemed to define the place. There was some great stuff mind you (I had one of the best steaks EVER!) but nothing seemed to scream out "Hey! I am the iconic food of Chile!" This is most likely due to the fact that my Spanish is non-existent, and reading menus was an exercise in guessing words from similar pieces in other languages (a dangerous, if potentially hilarious game), so I never quite got a sense of what was really available. The iconic drink was no problem though! Pisco sour rules down there. There's no need to post a recipe though, since it's basically a whiskey (or whisky, take your pick) sour made with the local hooch called pisco. It is delicious and sinister at the same time (i.e. they can sneak up on you pretty quick. 'Nuf said!).

I did have some inspiration while there though. One of my bosses posted a video on my Facebook account about hot tamales. If this doesn't inspire you to want a tamale, then I don't know what will. (Don't wait for a punchline in the video, it just does the same thing over and over.) I didn't manage to find a tamale anywhere during my travels, but I did find this thing:

...the capsule that pulled the trapped miners to the surface after two months under ground. It kinda looks like a tamale, so I figured I had my theme. Now for the recipe!

This recipe comes from Cocina -- Spanish for kitchen (ok, I know one word). A great little cookbook that came out of Ten Speed Press a few years back (ok -- 14 years back). It's the kind of cookbook I can really get into -- great pictures, wonderful recipes, some neat new techniques, and thin enough that you don't get all distracted by a million possibilities and then never open it again.

A tamale is basically a steamed bun with a filling. The whole bundle is held together by a corn husk. So, the first step is to put some corn husks in a bowl of water to soak for awhile. Use a little plate to keep them submerged.

Where on Earth do you get corn husks? If you're lucky enough to have a latino grocery in your town, then that's a good bet. I get mine at Chilly Chiles, who augments their massive collection of hot sauces with some kooky ingredients like these.

Next, you make the dough. You need one cup of masa harina (corn flour), 2 tablespoons of corn meal, 1/2 teaspoon baking powder, 3/4 teaspoon of salt, one ripe banana, 1/4 cup of butter, some chipotle chile in adobo, and some bbq sauce.

First, get the wet ingredients mixed. Mash the banana, then add a chopped chipotle chile with a bit of adobo sauce and mash that around too. Finally, add 5 tablespoons of bbq sauce and mix it in. The original recipe calls for 6 tablespoons of bbq sauce and no chipotle, but we want a hot tamale, hot, hot tamale!

Put the dry ingredients in a mixer. Then cut in the butter until it's all crumbly. Add the banana and bbq sauce mix and whirl that around on fairly high speed for about two minutes until the dough is nice and fluffy. (The book calls for 8 to 10 minutes, but my dough looked ok after 2 and the mixer was just plain too noisy.)

Scrape down the sides of the mixing bowl and make your dough into a nice ball.

Now for the filling. You'll need a lime, a banana, some leftover chicken (or pork, or duck, whatever! the recipe actually calls for duck), 1/2 cup of cheese, some scallions (I never have any, but the Egyptian onions are still going strong -- in spite of the snow!), and some chiles (because we want a hot tamale, hot, hot tamale!).

Dice the banana, and squeeze the lime's juice over it. Then add the chopped chicken (if you make this without using leftovers, fry-up about 4 chicken thighs), the cheese, the chile, and the chopped onions and mix that all around.

Now, lets make tamales, hot, hot tamales! (I am starting to annoy myself with this...)

Take your ball of dough and cut it into 8 pieces (the recipe says 6 to 8, but seriously, just try to cut something into 6 -- ok, it's not THAT hard, but still).

Roll the pieces into balls, swapping dough between them to make sure they are evenly sized.

Now get your corn husks out of the water. Rummage through them and stack the widest ones to the side. Shred the thinner ones and the damaged ones to make a pile of tamale ties.

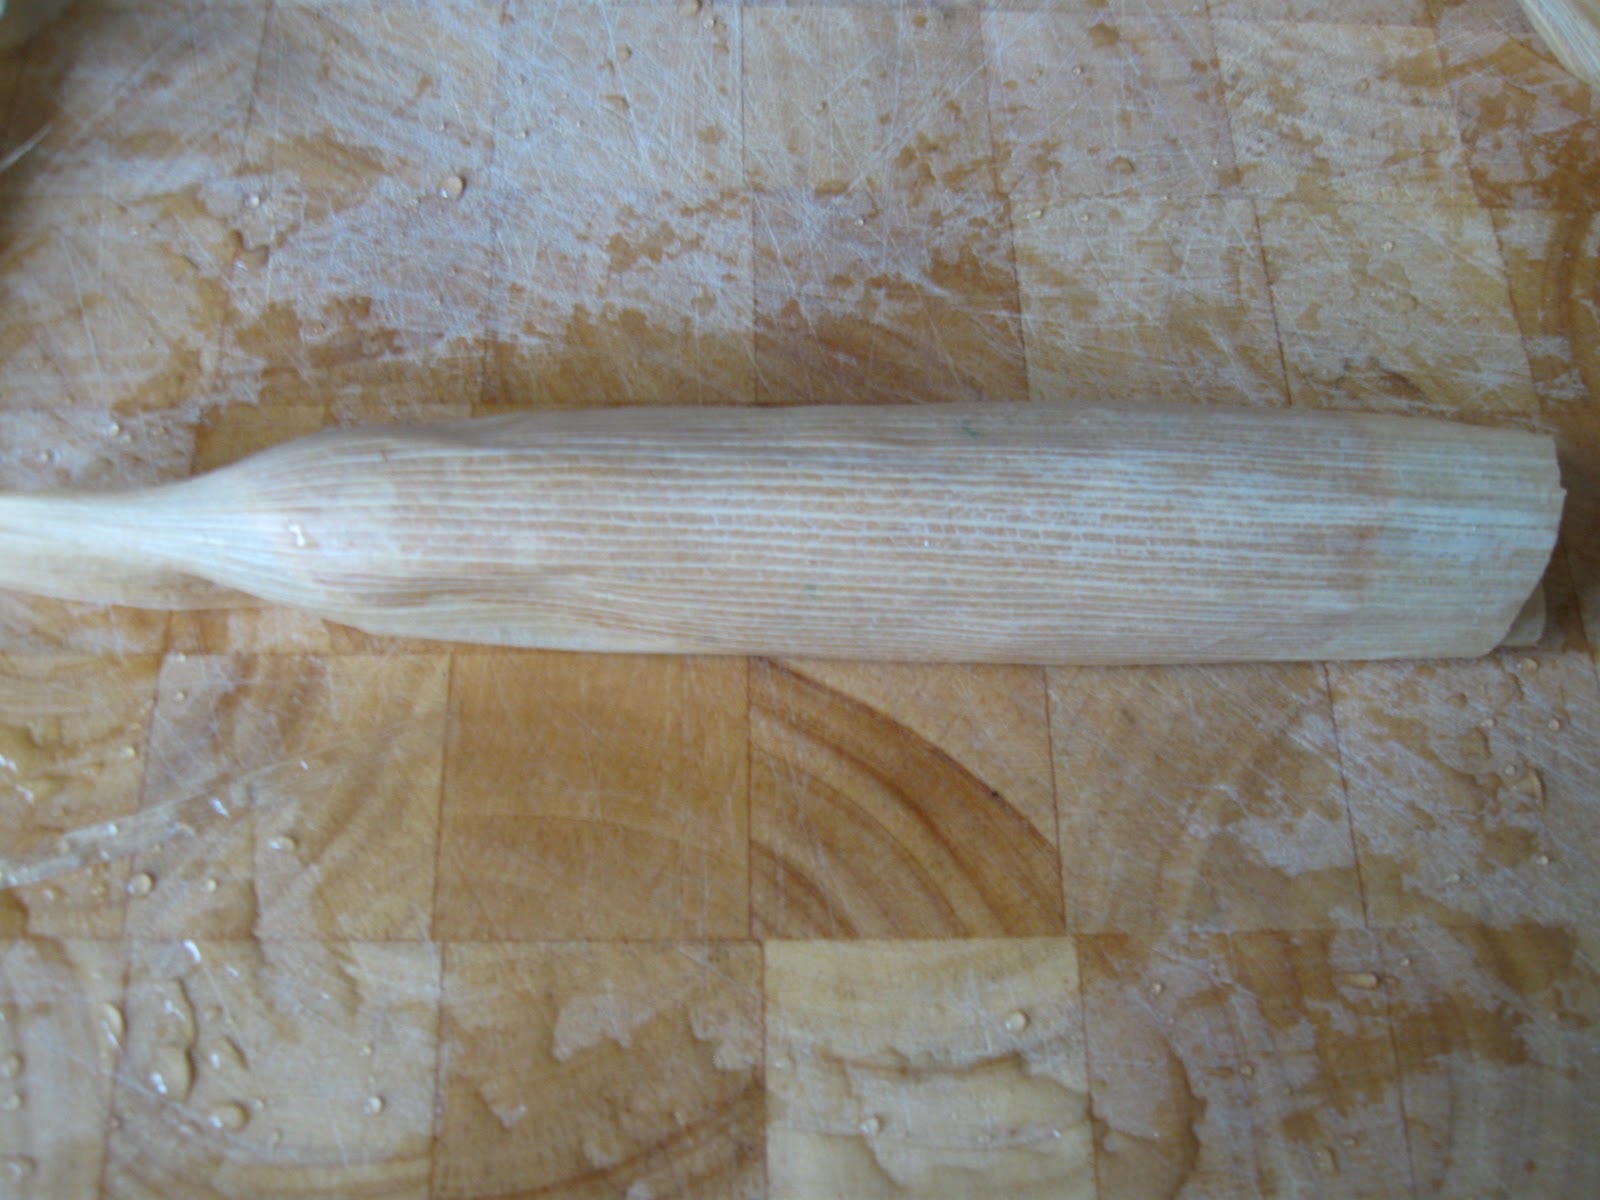
Put a ball of dough in the middle of a corn husk and then flatten it out, making sure you have enough space at the edges and ends to tie the tamale properly (try one first to get a sense of how it works). Put some filling in the middle (a heaped small wooden spoon was just right here),

and then roll it into a tube, making sure the dough wraps completely around the filling.

Tie the thin end with one of your corn husk strings.

Then, tuck the open end down for a second to help seal the filling in there.

Pull the husk back away from the filling, ...

and tamp the tamale dough down a little to give you some room to tie the top shut. Don't tamp too hard, or the corn husk will split. (Don't worry if it does, just unwrap it and pop the dough into another corn husk.)

Tie the top, and you're all set. Now do the other 7. (The recipe advises to leave the second end open, but I like the way they look if you tie both ends -- an added advantage is that you avoid any oozing while they cook. And we all know that it's good to avoid unwanted oozing!)

I find it easier to do all this in assembly line fashion. I roll all the tamales, then tie all the bottoms, then do all the tamping, then tie the tops. If you have helpers, you can form a real assembly line, and each person can become an expert at a specific task. It's pretty fun!

Now what?

Now you cook 'em! Put them in a steamer (four per layer) and steam for about 20 minutes. While they're cooking, you can make a nice fire-roasted salsa to go with it (this post is long enough already though, so I'll put that one up a little later).

To serve, you can put them on a plate as is, or slide the knot off the fat end and peel back a couple of strips to expose the insides, or just eat them like a banana. Up to you.

I hope you like tamale! I like tamale, hot, hot tamale!

Wednesday, October 13, 2010

Bake a cake!

My youngest daughter loves to make this cake -- I do too because a) I get cake at the end, and b) I get to have fun with little My in the kitchen.
Little My, by the way, is a character from the Moomintroll books. As you can she, she's a spunky little kid (actually a mimble, and actually REALLY little -- like the size of an ant -- although the drawings in the book are a little inconsistent with this bit of knowledge derived from the story). The point of all this is that Little My is one of said daughter's numerous nicknames. Just so you know.

This cake is great fun because you hardly need any dishes and it has only a few ingredients. It comes from Regan Daley's In the Sweet Kitchen. This heafty tome is a definitive baking book -- it even says so on the cover. I've come to the conclusion though that I don't really jive with big fat books like this -- there's just too much in there. I'm more of a 60-recipe-cookbook-kind-of-guy (I can add that to my stereotype of being a fixed-gear-bicycle-loving-piano-plunking-harley-riding-fly-fishing-beer-swillin'-crappy-chess-playing-art-dabbler-who-cooks-and-gardens).

Now that we have all that out of the way, you'll need some cocoa, flour, sugar, salt, oil, vinegar, baking soda (to make a volcano with the vinegar, yeah!), and vanilla extract. You should also preheat your oven to 350.

Sift 1 1/2 cups of flour into your baking pan. I use a 9" round one, but this will also work with an 8" round or an 8" square (apparently a 9" square will take 5-7 minutes less to cook -- see what I mean about definitive?). You can put some parchment in the pan and try to get it out of there later, but I go for an unprepped pan and just serve it right out of the tin (but that's the kind of guy I am -- maybe I should add that to the list too....)

In a separate bowl, mix 1 cup of sugar, 1/4 cup of cocoa powder, 1 teaspoon of baking soda, and 1/2 teaspoon of salt.

Add your cocoa mix to your flour and stir it around.

Once the dry stuff is evenly combined, make three wells in the surface (a big one, a medium one, and a small one -- just like Goldilocks probably would).

In the big dent, put 6 tablespoons of oil (I've used peanut, olive and grapeseed before -- the recipe actually calls for canola). In the small dent, put 1 teaspoon of vanilla extract. In the medium one (this one is last, because...) add 1 tablespoon vinegar (... the volcano part will start -- don't get your hopes up, it doesn't really volcano BUT the vinegar and baking soda will start reacting and you want most of this reaction to happen in the oven so that the cake rises, so don't fart around at this point: get this puppy in the oven soon!)

Finally, pour a cup of cool water over the whole thing and start mixing.

Don't get too rough with the batter, but get it combined in a no-nonsense way (we're racing against the volcano, remember). You don't want to overwork the batter or it will start to turn into bread instead of cake. Just make sure it is pretty much combined, and especially work into the corners of your pan to avoid huge dusty flour globs. Pop it in the oven and bake for 30 minutes (or -- the baker's awesome caveat -- until a skewer comes out clean when poked into the centre: this almost always takes my oven about 38 minutes).

Let the cake cool before you cut it. If the cake comes out of the oven at about the same time that supper is ready, it should be set for eating by the time your dinner is done. Just sayin'.

Serve up with a sprinkle of icing sugar, and enjoy your journey to the peaceable kingdom.

Saturday, October 9, 2010

Frost, peppers, and thanksgiving.

The first killing frost is expected tonight, so that led to a flurry of activity in the garden. I have a bunch of tender plants in pots that I try to keep through the winter, so they had to get under cover. I also had to haul in the pepper crop before they get frozen and turn to mush on me.

One of the plants I'm bringing in is some bougainvillia, which gave me a nice show this summer. It's already been a little singed by light frost, so hopefully I can bring it through the long dark ahead. I am really fond of these plants -- they were very common in Malawi where they grew on and over everyting, and so I usually have some funny memory triggered when I see them on my doorstep.

My mini-pomegranate  is also on the way in. It can take a few chills, and I usually let it lose it's leaves for the winter, but I prefer to do this gradually. Plus I want to keep the neato fruits from freezing.

On the pepper front, I got a pretty good yiled of Aji Limon from a couple of plants I kept in pots on the front step.

The little troopers are still optimistically blooming. You can tell that this plant is from the Capsicum baccatum  species from the yellowish spots in the middle of the flowers (other pepper species don't have these spots). The baccatums are native to South and Central America, and have lots of heat combined with an interesting fruity flavour. The other commercially grown pepper species are C. annuum (the typical bell peppers, jalanenos, cubanelles, etc...), C. chinense (the habanero gang), and C. frutescens (the tobasco types) -- just so you know in case it happens to come up over diner or something. The baccatums are far and away my favourites.

I've left a bunch of pods on the plants just in case they happen to make it through the night and we get another warm stretch. (I'm optimistic too!)

The last of the optimistic gang is this pineapple sage, who is just starting to set some blooms now (it may be a pile of mush in the morning, but bless its heart for trying anyway).

Out in the garden, I caught the Egyptian Onions in the act of taking over the planet. You may recall from other posts that these onions form little bulbs at the tops of the leaves. Once the bulbs get heavy enough, the leaves bend to the ground and the bulbs start sprouting. Well -- here's the evidence. The leaf is the beige thing coming out of the bulbs (it has died off now that the baby colonists have taken root).

While poking around the onion patch, a buzzing caught my ear. Some bumble bees were making the most of the sunny day. (This is why I leave weeds all over the garden -- someone usually likes them.) Note that it is almost impossible to take a good picture of a bee.

On the bug front, this was the year of the spider. There were huge webs all over the place this year -- usually with huge spiders in the middle of them. This one caught my eye, resting in the arms of one of my ginkgo trees. One that didn't catch my eye was the one I stupidly walked through almost every morning -- it was between the basketball net and the car and I was almost always too drowzy to remember the determined dude who replaced it every day.

And now on to giving thanks. I picked up the latest Saveur the other day, having been captivated by the "25 greatest meals ever!" promise. This proved to be a moderate letdown, since they were more like the "25 most memorable meals from the 25 people we picked to contribute to this issue! Ever!" However there was a real gem in there. It was Lunch Lessons from Dean Koontz. I don't know if I thought it was great because Mr. Koontz is a real writer, or because he had a good story to tell -- probably both. Let me share with you the closing words of his piece.

There is a tender truth that I have realized only after decades of living: We are often blind to the fact that we are in the presence of grace, and that whether we are having a sandwich on a river bank or on a park bench, we ought always to remember that maybe, just maybe, we are in the company of saints potential.

Amen to that.

Thursday, October 7, 2010

Pasta alla carbonara

You may recall a few posts back that I suffered a little cringe during the movie Eat, Pray, Love when the voice-over was speaking about pasta alla carbonara, and the image showed noodles in a tomato sauce. I said at the time that we'd deal with that in another post. Well, here we are!

By the way, this is a perfect opportuntiy to offer my profound thanks to Charles, the proprietor of Canvas restaurant in Ottawa. The other day, I booked in a date with my youngest daughter for a birthday lunch (I had to be out of town on the real birthday, so this was a please-forgive-me meal.) Charles pulled out all the stops: he had the yellow chair reserved for us and even put spaghetti alla carbonara on as the pasta special for the day (my little angel happens to love carbonara, and the cooks did a bang-up job). So cheers, Charles!

This recipe is from the impeccable issue of Saveur that features classic roman food. If you don't have a copy of this, you should really try and find one. It's one of the best editions of a cooking magazine EVER! Mine looks like crap from all the water marks and splatters, so if you find one be sure to snag an extra for me too. I'm good for it, honest! (If I don't have money, I'll cook you something.)

This recipe is very similar to cacio e pepe, except that it has extra ingredients (viz: bacon, AND eggs). This tells you that it can only be better than cacio e pepe (if you happen to have bacon and eggs on hand). If you don't, then I am reminded of a song on my Bing Crosby Christmas CD that goes:

Christmas is a coming, the cider's in the keg.

If I had a mug of cider I wouldn't have to beg.
If you haven't got a mug of cider, half a mug will do.
If you haven't got half a mug, may God bless you!

So, if you don't have eggs and bacon, may God bless you! (But cacio e pepe is wonderful if you don't.)

ANYWAY, this recipe calls for Reggiano Parmesan (1 3/4 cups, finely grated), 4 oz. of guanciale (or bacon), 1 egg and three egg yolks, some salt, pepper, and (of course) some noodles. Don't skimp on the noodles. Get nice ones -- these are from rustichella d'abruzzo and are worth every penny of the 5 bucks each package costs.

The first step WAIT! The first step is to pour yourself a glass of something awesome. Then...

slice your bacon into chunks. I buy my bacon from Piggy Market in Ottawa, and get it by the slab rather than sliced. This lets me slice it if I want (for brekkie with oatmeal cooked with a wee splash of Scotch), or I can cut it into chunks if I'm making something that calls for lardons like a Flamm. Guanciale is made from a different part of the hog, but it seems close enough to bacon that if you don't have any you should feel free to substitute (Carol may disagree with me here, and she's welcome to weigh in, but this recipe came out aces as far as I'm concerned!)

So. Chop your bacon and add it to a pan with a splash of olive oil over medium heat.

Cooking bacon in olive oil strikes me as genius beyond compare. It also strikes me as deadly, so be sure to wear your apron (unless you don't care about the shirt you have on).

While the bacon is browning, grate your Parmesan. Use the small holes on your grater. (I normally go for the coarse side of the grater, but you need to make the cheese fine enough so that it dissolves into a nice creamy sauce.) I find a circular motion works best (as opposed to up and down grating).

I like box graters because you always have to stop before you grind your knuckles off. This leads to another case of "cook's treats" which happen to go just fine with that nice wine you poured earlier.

Once the bacon is close to done, hit it with several grinds (vigorous ones if you like) of black pepper. Remember that like disolves like, and that the flavour in peppercorns is an oil -- so getting it into some oil helps the flavour blend into your dish.

Stir that around for another minute or two, then remove the bacon (and all the oil and fat) to a bowl to cool for awhile. (This blog isn't likely to make it onto the Heart and Stroke Foundation website anytime soon, but it may make it onto the "My Soul is Kick-Ass Happy" website if anyone decides to make one -- hint, hint.)

Now, start heating the water to boil your pasta. Starting this now ensures that the oil and bacon can cool before you need them for the sauce. This is important because you need to add eggs to this stuff. If it's too hot, the eggs will cook and curdle too early leaving you with a lumpy carbonara instead of a nice, smooth, creamy one. This is also why you mix all this stuff in a bowl, rather than in a skillet -- it too will cook the eggs before they combine properly.

Once your noodles are cooked, scoop out about a cup of pasta water. You may need only a little, but snagging it now makes sure you have as much as you need later.

Mix your cheese and eggs into the bacon and oil that you had set aside and let cool.

Then pop your cooked pasta in there and start stirring. The pasta will cook the eggs, so work fast. I use tongs since they let you pick up and mix as required. Be gentle, but be quick. Add splashes of pasta water if you think it's too gunky in there. The goal is to make a creamy sauce that coats the noodles to perfection!

And you did it! Top-up your wine if you need to, and Mangia!!